How to create a Custom Content Element:
First we need some basic information about our custom element, or the tab it can belong, if we want our custom elements to be in a unique tab. Open [All.tsconfig]
                #
                # Custom Content Element
                #
                <INCLUDE_TYPOSCRIPT: source="FILE:EXT:youtube_demo/Configuration/TsConfig/Page/CustomElConfig/MYSTRANGEEL.tsconfig">
After this we create a new file that will hold the data for the Custom Content Element so we can keep [All.tsconfig] clean. The path I choose youtube_demo/Configuration/TsConfig/Page/CustomElConfig/MYSTRANGEEL.tsconfig.
*NOTE: "youtube_demo" is my sitepackage name, yours might be different.
Open [MYSTRANGEEL.tsconfig]
                #############
                #### RTE ####
                #############
                mod.wizards.newContentElement.wizardItems {
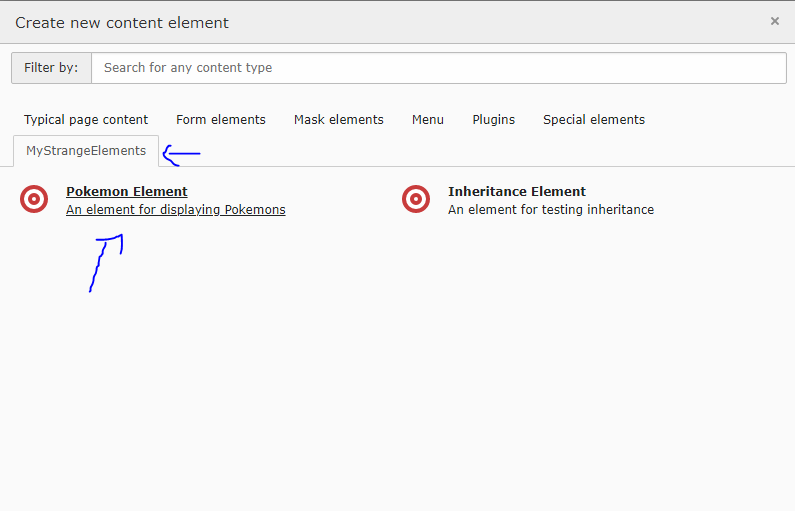
                     strange.header = MyStrangeElements
                }
                mod.wizards.newContentElement.wizardItems {
                   strange {
                      elements {
                         pokemonElement {
                            iconIdentifier = content-target
                            title = Pokemon Element
                            description = An element for displaying Pokemons
                            tt_content_defValues {
                               CType = pokemon_element
                            }
                         }
                      }
                      show := addToList(pokemonElement, inheritanceElement)
                   }
                }

As we can see we have now defined our element "Name", "Ctype", "Description", "Icon". We have also created and specified the new tab this element will be found.
Now we can go ahead and change the database so we can save our custom element data. We can do this by creating a new table or just add some fields in tt_content table. For this example I will use the tt_content to store our element data.
Open [ext_tables.sql]
                #
                # Add SQL definition of database tables
                #
                CREATE TABLE tt_content (
                -- Pokemon Element Fields
                selected_pokemon VARCHAR(255) DEFAULT '0' NOT NULL,
                type_pokemon VARCHAR(255) DEFAULT '0' NOT NULL,
                image_pokemon int(11) unsigned DEFAULT '0' NOT NULL,
                );
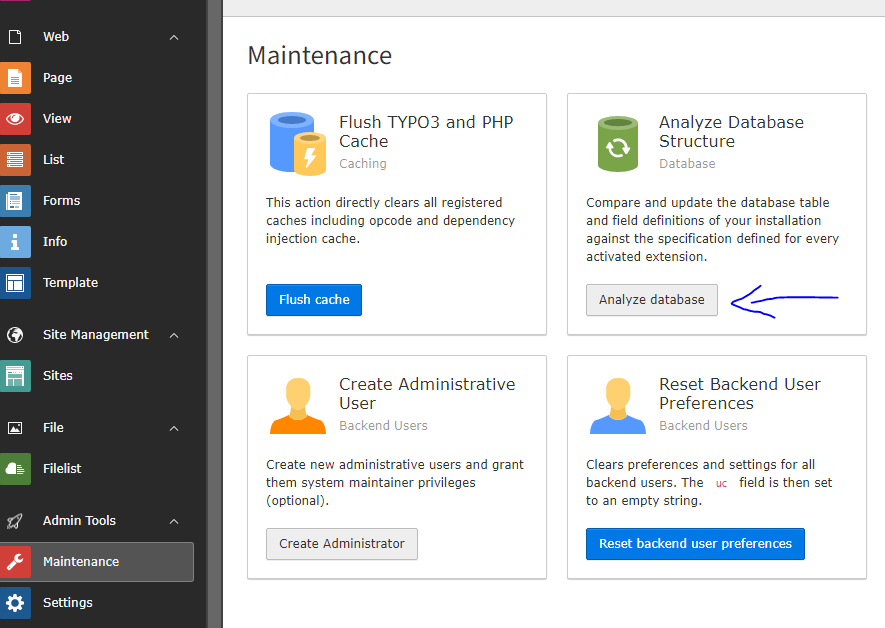
*NOTE: To check an update our database changes we must go to Maintenance module and update it using Analyze Database Structure. Update everything until you get "Database schema is up to date. Good job!"

*NOTE: Always clear cache when you change something in the backend!
Now we can can tell out new element what to save, and what values it needs to store in the fields we just created. We do this using [tt_content.php]
Open [tt_content.php]
                <?php
                defined('TYPO3') or die('Access denied.');
                // Fields array has been moved here to make code cleaner
                require_once 'tt_content_fields.php';

                // Poekmon Element Basic info
                \TYPO3\CMS\Core\Utility\ExtensionManagementUtility::addTcaSelectItem(
                   'tt_content',
                   'CType',
                    [
                        'Pokemon Element',
                        'pokemon_element',
                        'content-target',
                    ],
                    'textmedia',
                    'after'
                );
                // Here you decide what input fields to show.
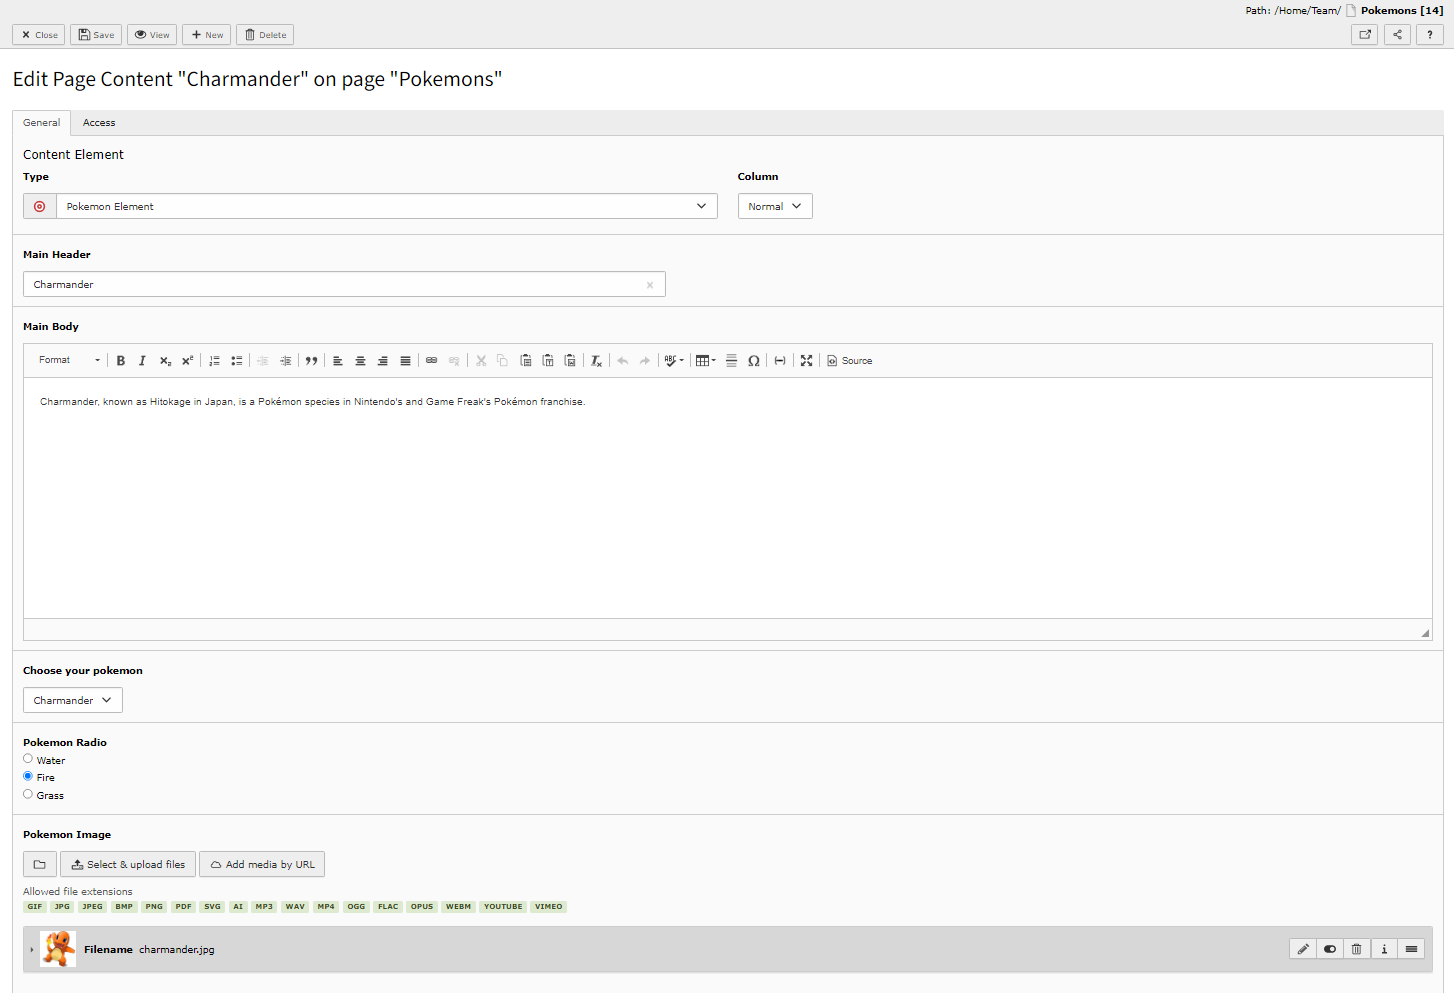
                $GLOBALS['TCA']['tt_content']['types']['pokemon_element'] = [
                   'showitem' => '
                         --div--;LLL:EXT:core/Resources/Private/Language/Form/locallang_tabs.xlf:general,
                            --palette--;;general,
                            header; Main Header,
                            bodytext; Main Body,
                            selected_pokemon; Choose your pokemon,
                            type_pokemon; Pokemon Radio,
                            image_pokemon; Pokemon Image,
                         --div--;LLL:EXT:core/Resources/Private/Language/Form/locallang_tabs.xlf:access,
                            --palette--;;hidden,
                            --palette--;;access,
                      ',
                   'columnsOverrides' => [
                      'bodytext' => [
                         'config' => [
                            'enableRichtext' => true,
                            'richtextConfiguration' => 'default',
                         ],
                      ],
                   ],
                ];

                // Add this fields to db
                \TYPO3\CMS\Core\Utility\ExtensionManagementUtility::addTCAcolumns('tt_content', $allFields);
As I have commented this is only part of the file the fields array I have added to a new file to make this file more clean. In this file we decide what input fields will be shown. And update the database,
Open [tt_content_fields.php]
                <?php
                defined('TYPO3') or die('Access denied.');

                // All fields
                $allFields = [
                   'selected_pokemon' => [
                      'exclude' => 0,
                      'label' => 'LLL:EXT:examples/Resources/Private/Language/locallang_db.xlf:tt_content.selected_pokemon',
                      'config' => [
                         'type' => 'select',
                         'renderType' => 'selectSingle',
                         'items' => [
                            ['Pikachu', 'pikachu'],
                            ['Squirtle', 'squirtle'],
                            ['Bulbasaur', 'bulbasaur'],
                            ['Charmander', 'charmander'],
                         ],
                         'default' => 'pikachu'
                      ],
                   ],
                   'type_pokemon' => [
                      'exclude' => 0,
                      'label' => 'LLL:EXT:examples/Resources/Private/Language/locallang_db.xlf:tt_content.type_pokemon',
                      'config' => [
                            'type' => 'radio',
                            'items' => [
                               ['Water', 'water'],
                               ['Fire', 'fire'],
                               ['Grass', 'grass'],
                            ],
                      ],
                   ],
                   'image_pokemon' => [
                      'label' => 'LLL:EXT:core/Resources/Private/Language/locallang_tca.xlf:sys_file_reference.image_pokemon',
                      'config' => \TYPO3\CMS\Core\Utility\ExtensionManagementUtility::getFileFieldTCAConfig('image', [
                         'appearance' => [
                            'createNewRelationLinkTitle' => 'LLL:EXT:frontend/Resources/Private/Language/Database.xlf:tt_content.asset_references.image_pokemon'
                         ],
                      ], $GLOBALS['TYPO3_CONF_VARS']['SYS']['mediafile_ext'])
                   ],
                 ];
*NOTE: Flush all caches!
We have added our input fields, we have three input fields as we have created to new fields in tt_content table. Now our new custom content element is working fine. We can see it in backend and save our fields.

Now that in our backend everything is working we can try to add this information to backend and display somehow. First we must decide what information will travel to front end. We do this by using typoscript.
Open [setup.typoscript]
                #########################
                #### Content Element ####
                #########################
                lib.contentElement {
                    templateRootPaths.200 = EXT:youtube_demo/Resources/Private/Templates/CustomContentEl/
                }
                tt_content {
                    pokemon_element =< lib.contentElement
                    pokemon_element {
                        templateName = PokemonStarters
                        dataProcessing{
                            10 = TYPO3\CMS\Frontend\DataProcessing\FilesProcessor
                            10 {
                                references.fieldName = image
                                as = pokemon_images
                            }
                        }
                    }
                }
As we can see in the code above we took an images and put them in a new array, we also decided the path and html file that will be used to display this content element. Path "EXT:youtube_demo/Resources/Private/Templates/CustomContentEl/" and File Name "PokemonStarters".
*NOTE: Don't forget to use you own sitepackage name in path!
Now we will open the html file and display our Custom Content Element to all our website users.
Open [PokemonStarters.html]
                <html data-namespace-typo3-fluid="true"
                    xmlns:f="http://typo3.org/ns/TYPO3/CMS/Fluid/ViewHelpers">
                    <h2>{data.header}</h2>
                    <f:for each="{pokemon_images}" as="pokemon_img">
                        <f:image class="pokemon-image" image="{pokemon_img}" />
                    </f:for>
                    <div><f:format.html>{data.bodytext}</f:format.html></div>
                    <p><strong>Name:</strong> {data.selected_pokemon}</p>
                    <p><strong>Type:</strong> {data.type_pokemon }</p>
                </html>
*NOTE: Flush frontend caches

